How to Design Personalized Onesies with Cricut Joy?
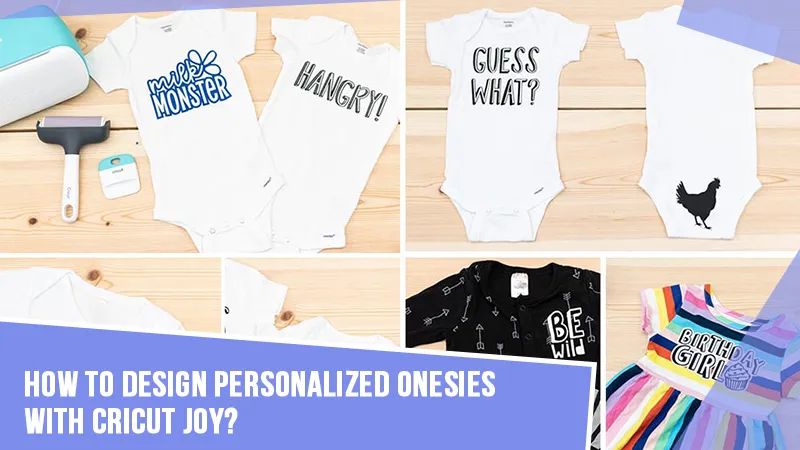
If you've recently welcomed a new member to your family, you're likely to be extra protective. Many parents include onesies in their collection to ensure their baby's health. In simple words, onesies are one-piece garments that provide full-body coverage, offering protection from illness. They are available not only for babies but also for couples and the entire family.
DIYers can gift these design ideas for Cricut Joy on various occasions, such as birthdays, baby showers, or anniversaries. Following this, Cricut Joy is a compact and portable cutting machine that cuts more than 50+ materials with ease. Whether you're a beginner or an experienced crafter, this blog will guide you through the process of creating personalized onesies with the Cricut Joy cutting machine.
Step 1: First, Create a Design on the Cricut App
Before commencing the process of making these specific design ideas for Cricut Joy, take a sneak peek at the following details:
- Initiate the process by logging into the Cricut app using the credentials (Cricut ID & Password).
- Now, press the Text option and start typing the text you want on the onesies.
- Once you finish typing the text, change its font, color & size from the menu bar given at the top of the screen.
- Further, if you want the T-shirt in the same color, then select all of them and press the Attach button.
- Following this, press the Make It option appearing on the top right side of the canvas.
Step 2: Then, Cut and Print Your Design
- Afterward, you will land on the mat preview page and drag the Mirror toggle to the right side.
- Now, you will notice that your text will instantly turn backward, and then press the Continue button.
- Afterward, the Cricut app will start looking for your Cricut Joy machine via Bluetooth feature.
- Next, choose the material of your choice and place it on your cutting mat.
- Following this, unwrap your Cricut cutting mat and material from the box.
- Now, stick the chosen material on the mat with your gentle hands without any bubbles.
- Further, place your mat into the machine and tick the Insert blinking on the right side of the machine.
- Concluding the above steps, you need to have patience till the time your Joy cutting machine is following the commands.
- Following this, empty your cut-die machine and remove the cutting material from the Cricut mat.
- Afterward, remove the extra pieces using the trimmer tools and weeding tool.
Step 3: Now, Press Design on the Onesie
Apart from a wide range of design ideas for Cricut Joy, you decided to create custom onesies for babies and adults. After making and cutting down the designs, carry on the process by removing the unwanted material. Following this, place the weeded-out design on the onesies blank very carefully using the scraper tool with gentle hands. Now, to start the custom onesies project, you need to study the steps given below:
- First, craft the custom onesies process by setting up the EasyPress temp and timing using the Cricut Heat app.
- Second, use a lint roller to clean the blank to remove any dust or debris, and pre-press the mat for at least 5 seconds.
- Third, place the cardstock inside the blank and place the design on the blank.
- Next, stick the design using the heat-resistant tape so that it doesn't move during the pressing process.
- Now, place the butcher paper on the top of the design and place your heat press on the blank.
- Also, ensure that you don't move the press and put some pressure during the heating process.
Step 4: Lastly, Remove the Vinyl
Without any doubt, after wrapping these steps, you will finally disclose the final design to everyone. In order to do so, you've to follow the steps mentioned in the given below steps:
- Now, let the design cool down for a few minutes so that you don't harm yourself with the press.
- Following this, take off the butcher paper with soft and gentle hands to avoid any damage to the design.
- Compliments! You've finally crafted one of the design ideas for Cricut Joy owners with your talent & craft plotter supplies.
In conclusion, with all of these steps, you will indeed become an expert in how to create custom onesies with a Joy cutting machine. These personalized onesies are going to be the best gift for couples, new moms, and newborn babies. Besides, Cricut Joy is one of the small yet compact craft plotters as compared to other models. Recently, the company added its successor, naming it Cricut Xtra, which offers more features.
FAQs
Answer:
Yes, it's definitely worth buying a Joy cutting machine for all the freshers. With its lightweight portability
feature, the DIYer can swiftly transform their dream design ideas for Cricut Joy into reality. This cutting machine
allows the newbies to cut down 50+ materials with ease and create, customize,
personalize, and organize projects. Apart from that, this model focuses on
motivating the freshers to come out of their comfort zone and make new crafts
from scratch.
Answer: There are specific tips that the DIYer needs to consider before accessing the Joy cutting machines. Have a look at those tips in the below pointers:
● You can access the Joy cutting machine by
connecting it with PCs, tablets, smartphones & laptops.
● Ensure that you remove the project from the
cutting mat using a tweezer or weeding tool.
● Protect the mat by placing a plastic cover to
protect its adhesive surface and make it reusable.
Answer: To craft custom onesies with Cricut Joy, DIYers need to get supplies from the official website or Amazon. Take a look at the materials list below:
● Cricut Joy machine
● Cricut software
● Cutting mat
● Compatible material
● EasyPress
● Butcher paper
● Heat-resistant tape
● Butcher paper
● Bodysuit blank
● EasyPress mat
● Tweezer or weeding tool


![How to Engrave Wood With Cricut Maker? [Ultimate Guide]](https://mannydesignspace.com/upload/blog/658be25b724f4how-to-engrave-wood-with-cricut-maker-ultimate-guide.webp)
![How to Make Stickers With Cricut Joy? [Full Tutorial]](https://mannydesignspace.com/upload/blog/662f8707e9780how-to-make-stickers-with-cricut-joy-full-tutorial.webp)